
This is my third year teaching Geometry and every year, students have a hard time with special right triangles. Last year, I had a student ask me, "Mrs. Newell, why is the hypotenuse in a 45-45-90 triangle always √2 times longer than the legs? Why isn't it only 2 times the leg, since 45 is half of 90?" This question made me reflect on my teaching and it made me realize that I was not teaching the "why" in special right triangles.
So, I had students discover the rules for 45-45-90 and 30-60-90 triangles by splitting a square in half and an equilateral triangle in half. They had to use the Pythagorean Theorem to solve for the length of the diagonal (square) and the altitude (equilateral triangle). I told students that each side of the square was 1 cm and they had to use the Pythagorean Theorem to find the length of the diagonal. After students used the Pythagorean Theorem to find the length of the diagonal of the square, I asked them to tell me the relationship between the legs and the hypotenuse of a 45-45-90 triangle. Many students told me that the hypotenuse is always √2 times longer than the leg "because the Pythagorean Theorem says so."
On the 30 60 90 paper, I told students that each side of the equilateral triangle is 2 inches and that they need to find the length of the altitude.


The next day, we learned about 30-60-90 triangles. We used Pythagorean Theorem on an equilateral triangle (shown above). After those notes, I had students fill out the following chart to see the pattern of (x, x√3, 2x). I split the chart into "three levels" again. The first level are basic numbers where students do not have to do any math to find the rest of the row. For example, I put a 6 in the x column and they had to find x√3 and 2x. Another example would be putting a 14 in the 2x column and trying to find x and x√3. Once I feel that all students have "conquered level one", we move on to level 2 where I add in radicals in the "x" column. Students have to multiply the radicals to get the x√3 column. When students have "conquered level two", we move on to level 3. Level 3 is the column where I will put a whole number in the x√3 column and they have to rationalize the denominator to get the value of 'x'.


Overall, I feel like this lesson went GREAT. My special education students are ROCKIN' special right triangles. I feel like the discovery and the "why" helped them the most. They will now tell other students that in a 45-45-90 triangle, the "hypotenuse is always √2 times longer than the leg".
On the third day, we practiced some more with a "Stands Up-Hands Up-Pair Up" activity.
Directions: I hand out the Special Right Triangles: Hands Up-Pair Up to every student. The first thing that I tell students to do, is to "Write their name at the top of the paper." Next, I tell students to choose only ONE out of the 12 problems to complete. Once they complete the problem, I have them sign their name at the bottom of the box. When they are finished, they stand up, raise their hand ,and look for somebody else who has their hand raised. Students will switch papers with the person they pair up with and choose a problem on the other persons paper to complete. They will sign their name in the box that they just completed. Students need to get back their ORIGINAL paper so they can check over the persons work. Once they are finished checking work, they will repeat "Stand Up-Hands Up-Pair Up" and find a total of 11 different people to switch papers with.
With this lesson, I joined in on the fun and switched papers with students too. I was able to gain a better understanding of how well students understand the problems and to see which problems were giving them the hardest time.
All of the foldables, activities, and homework can be found when you CLICK HERE.
26
So, I had students discover the rules for 45-45-90 and 30-60-90 triangles by splitting a square in half and an equilateral triangle in half. They had to use the Pythagorean Theorem to solve for the length of the diagonal (square) and the altitude (equilateral triangle). I told students that each side of the square was 1 cm and they had to use the Pythagorean Theorem to find the length of the diagonal. After students used the Pythagorean Theorem to find the length of the diagonal of the square, I asked them to tell me the relationship between the legs and the hypotenuse of a 45-45-90 triangle. Many students told me that the hypotenuse is always √2 times longer than the leg "because the Pythagorean Theorem says so."
On the 30 60 90 paper, I told students that each side of the equilateral triangle is 2 inches and that they need to find the length of the altitude.


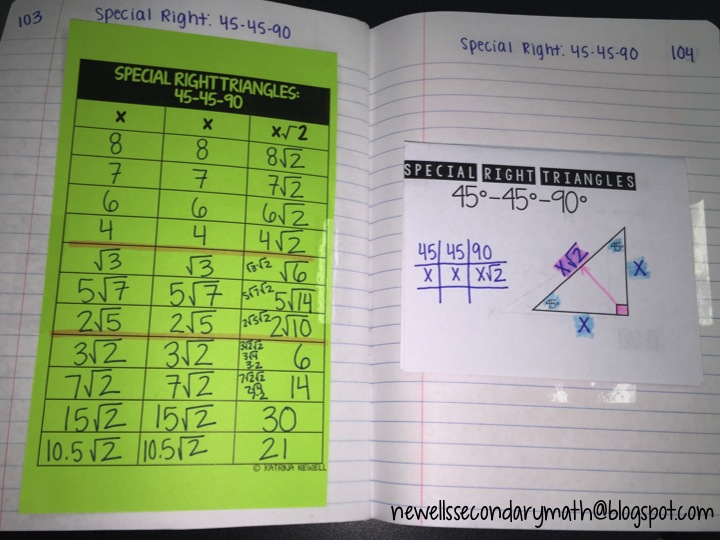
After those notes, I had students fill out this chart to see the pattern of (x, x, x√2). I love this chart because students can find a pattern between the numbers before using it in a 45 45 90 triangle. I split the chart into "three levels". The first level are just basic numbers where students do not have to do any math to fill out the chart. Once I feel that all students have "conquered level one", we move on to level 2. In level 2, I add radicals in the "x" column and students have to multiply the radicals to get the x√2 column. When students have "conquered level two", we move on to level 3. Level 3 is the column where I put a whole number in the x√2 column and they have to rationalize the denominator to get the value of 'x'. I find this chart very helpful for my special education students because they reference this page MORE than their foldable. It also helps remind students what to do when given each situation.

After the chart, I introduce this Frayer-Model foldable for 45-45-90 triangle practice. All of the Geometry teachers at my school use the "tic-tac-toe" method to solve for missing side lengths in special right triangles. The next image is what students will see in their notebook when they open it up. I have students highlight the angles and their side lengths. There are a total of 6 practice problems in this foldable and there is at least one problem from "each of the levels."


The next day, we learned about 30-60-90 triangles. We used Pythagorean Theorem on an equilateral triangle (shown above). After those notes, I had students fill out the following chart to see the pattern of (x, x√3, 2x). I split the chart into "three levels" again. The first level are basic numbers where students do not have to do any math to find the rest of the row. For example, I put a 6 in the x column and they had to find x√3 and 2x. Another example would be putting a 14 in the 2x column and trying to find x and x√3. Once I feel that all students have "conquered level one", we move on to level 2 where I add in radicals in the "x" column. Students have to multiply the radicals to get the x√3 column. When students have "conquered level two", we move on to level 3. Level 3 is the column where I will put a whole number in the x√3 column and they have to rationalize the denominator to get the value of 'x'.

After the chart, I introduce this Frayer-Model foldable for 30-60-90 practice. This has 6 practice problems.


Overall, I feel like this lesson went GREAT. My special education students are ROCKIN' special right triangles. I feel like the discovery and the "why" helped them the most. They will now tell other students that in a 45-45-90 triangle, the "hypotenuse is always √2 times longer than the leg".
On the third day, we practiced some more with a "Stands Up-Hands Up-Pair Up" activity.
Directions: I hand out the Special Right Triangles: Hands Up-Pair Up to every student. The first thing that I tell students to do, is to "Write their name at the top of the paper." Next, I tell students to choose only ONE out of the 12 problems to complete. Once they complete the problem, I have them sign their name at the bottom of the box. When they are finished, they stand up, raise their hand ,and look for somebody else who has their hand raised. Students will switch papers with the person they pair up with and choose a problem on the other persons paper to complete. They will sign their name in the box that they just completed. Students need to get back their ORIGINAL paper so they can check over the persons work. Once they are finished checking work, they will repeat "Stand Up-Hands Up-Pair Up" and find a total of 11 different people to switch papers with.
With this lesson, I joined in on the fun and switched papers with students too. I was able to gain a better understanding of how well students understand the problems and to see which problems were giving them the hardest time.
All of the foldables, activities, and homework can be found when you CLICK HERE.


